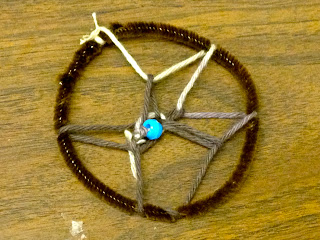
I am sorry that I have been away, school has been super busy and so has work! But moving on to the tutorial. So I did a program of making dreamcatchers for my residents! It turned out really well, and I was able to get enough materials for 30+ dreamcatchers at Hobby Lobby for less than $13! This can be done with anyone that has some basic craft skills, but I wouldn't recommend it for young children. This craft is probably 8 years and older.
Materials:
-Pipecleaner (I chose brown)
-Yarn (I chose a brown/beige/white tie-dye type yarn)
Cut your yarn into one long piece (at least 1.5 feet) and three smaller pieces for tassels
-Beads (I bought a bag of teal ones)
-Feathers (I chose a more natural brown/white/black bag)
Step 1: Gather your materials
Step 2: Make a circle with your pipecleaner
Step 3: Tie the long piece of yarn onto the pipecleaner circle
Step 4: Use this video (skip ahead to 1:15 for the important stuff) to learn how to make the inside of the dreamcatcher!
Step 5: In order to make sure that the middle of your dreamcatcher stays secure, tie a knot in it and add a bead for embellishment! Cut off any little strings of yarn you do not want hanging.
Step 6: Add your three tassels to the bottom of your dreamcatcher (or anywhere you want them) and cut them to desired length. Also, cut a small piece of yarn and make a loop at the top in order to hang your dreamcatcher.
Step 7: Add beads and feathers to your tassels and you are done! But beware: this could take a very long time depending on how detailed you want your beadwork/featherwork to be.
Hang your dreamcatcher over your bed now that it is done. The Ojibwa tribe hung dreamcatchers over their heads so that only their good dreams would be filter through, and would slide down the feathers to their heads.


You are kidding aren't you?
ReplyDelete